
Crochet a poncho with two rectangles I like poncho’s. They’re quite trendy at the moment, I even see them in the stores around here. Good news, because with this tutorial…

Crochet a poncho with two rectangles
Crochet a poncho with two rectangles
I like poncho’s. They’re quite trendy at the moment, I even see them in the stores around here. Good news, because with this tutorial you can make any poncho you like!
When you make a poncho in the round, you have to think about what stitch to use and you have to think about the increasing. That can cause a lot of counting and frogging…
But when you make a poncho with two rectangles, you can use any stitch you like! It’s also easier to combine and switch between stitches.
I made this pattern with two rectangles. You can replace my stitches with yours if you like.
My rectangles measure 40 by 80 cm. I would recommend you make the short side a bit larger, about 45 cm. My neck was quite wide and I had to make up a brim to make it smaller.
So you make two rectangles, you sew them together, you make up a nice edging and there it is: a lovely poncho!
If you scroll down the pattern, you find instructions about the sewing together and the edging.
Or you just make this flora poncho and go along with the pattern 🙂
You can also make the flora beanie and have a lovely matching set!
Materials
7 skeins flora yarn (drops)
hooksize 3,5 mm
Abbreviations (US)
ch = chain
sl st = slip stitch
sc = single crochet
hdc = half double crochet
dc = double crochet
st = stitch
v-stitch (dc, ch1, dc in the same stitch)
popcorn (work 4 dc in the same stitch. Drop the loop from your hook. Insert your hook from front to back under the top 2 loops of the first double crochet of the group.Grab the dropped loop with your hook and pull it through the stitch. Chain 1)
If you have any questions about this pattern, or if you like to stay updated about new patterns, like my facebookpage: haakjemee
You can also subscribe to my youtube channel: haakjemee youtube
This poncho is made of two rectangles.
One rectangle measures about 40 * 80 cm.
Flora poncho crochet pattern
Rectangle 2x
Chain 85
Row 1
sc in second st from the hook and sc in the next 83 loops.
Row 2
Ch 3 (counts as a dc throughout)
*skip next st; v-st in next st; sk next st; popcorn in next st;
Repeat from * across until the last 2 stitches; sk next st; dc in last st; turn.
Row 3
Ch 3
V-st in each popcorn and each v-st of the previous round. Dc in the last st. Turn.
Row 4
Ch 3
*v-st in first v-st of the previous round; popcorn in next v-stitch;
Repeat from * across; dc in the last stitch.
Repeat round 3 and 4 until your rectangle measures 80 cm. Make sure your last row is a row 3.
Edging rectangles
Use hdc to make an edge around the rectangle. Make sure the right side of the work is facing you.
Attach in the top corner on the right side and crochet: *2 hdc, ch 1, hdc in that corner.
Hdc in next 82 stitches.
2 hdc, ch 1, hdc in the corner.
The long side is made of double crochets, you made when you crocheted the rectangle.
Now you crochet 2 hdc around every dc until you reach the next corner.
Repeat from * until you reach the corner where you started the edge. Close with a sl st and fasten off.
Place the rectangles like shown in the picture below:
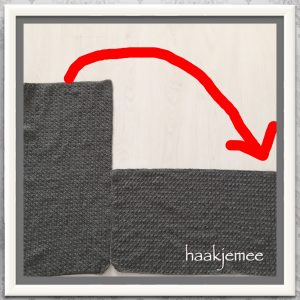
Sew the two sides, which are touching each other, together.
Then follow the arrow and sew the short side of the left rectangle to the long side of the right rectangle.
Sewing tips:
I sew on the right side of the work, in the outer loops:

After that, I also sew on the inside of the poncho, so the seem will be stronger.
Finishing
Crochet an edge at the bottom of the poncho:
sc in the first stitch;
Chain 4, sl st in the first loop of the chain;
Sc in next stitch.
*sc in next stitch; Chain 4, sl st in the first loop of the chain.
Sc in next stitch;
Repeat from * across and close with a sl st. Fasten off and weave in the ends.

Brim
I made a brim for the neck. The brim is made of two rectangles, which are sewn in later.
Ch 12.
Row 1: Hdc in third ch from the hook and the next 9 chains. Turn.
Row 2: Ch 2 (don’t count as a stitch); 10 hdc in the back loops of the stitches; turn.
Repeat round 2 until you reach the desired length.
I sewed the brim into the neck as I went. I kept crocheting and sewing until I was sure I had the correct length.
In the picture you can see what stitches I used to sew in: 2 stitches of the spaces between the upcoming parts of the brim, 1 stitch of the upcoming part itself.


When you finish the brim, you weave in the ends and your poncho is finished!


Heb je dit patroon toevallig ook in Nederlandse beschrijving? Dat vind ik net iets makkelijker lezen